Showing posts with label Components. Show all posts

Home Mechanic Toolbox

Saturday, July 19, 2014

If you are interested in building up your own bike, or would like to start doing your own maintenance and repairs, you have the exciting opportunity to get some new tools! But what tools do you need? What brand should you get? How much will it cost?

There are three main bicycle-specific tool manufacturers. They are Park Tool, Pedro’s, and Spin Doctor. There are others (Abbey, Avenir, IceToolz, Super B, Titan, etc.), but they aren't mentioned as often. Many will say that Park Tool is the gold standard, but those same individuals will admit that certain tools from other manufacturers are superior to those available from Park. For simplicity, and because most of my tools are Park, the prices and pictures represent Park Tools.


There are basically two methods to obtaining your tools. You can purchase a complete set, or buy the tools one-by-one. Typically, buying a set will be less expensive, but you will end up owning tools that you didn’t necessarily need (and perhaps missing some tools that you did). Once you know which tools you need, you can compare the cost of a complete set with purchasing them piece-by-piece.

Some of the tools you’ll need are specific to the bike and components you own (e.g. a bottom bracket tool). But many of the tools are universal (e.g. a chain break). I’ve listed the tools I have found useful and sorted them into four categories, irrelevantly utilizing the acronym CARB to define Cleaners, Adjusters, Replacers, and Builders.


The Cleaner


Item Price Description
Chain lube $ 8 Lubrication for the chain
Brush set $ 18 Brushes to scrub cassette, chainrings, chain, and derailleurs
Degreaser $ 18 Removes grease from cassette, chainrings, chain and derailleurs
Chain scrubber $ 24 Scrubs and degreases the chain
Total $ 68


Brush Set

Chain Scrubber


The Adjuster


Item Price Description
Spoke wrench $ 7 Replace or tighten spokes and true wheels
Anti-sieze compound $ 8 Reduce friction in threaded connections (e.g. pedals)
Grease $ 8 For moving connections (e.g. headset and bottom bracket)
Carbon paste $ 13 For tight carbon-to-carbon connections (e.g. seat post)
Pedal wrench $ 14 Tighten, remove, or replace pedals
5 N·m torque wrench $ 28 For 5 N·m torque requirements (e.g. stem and handlebars)
0-70 N·m torque wrench $ 45 For higher-torque requirements (e.g. pedals and crankset)
Total $ 123

Spoke Wrenches


Torque Wrench (5 N·m)

Torque Wrench (0-70 N·m)


The Replacer


Tool Price Description
Cassette lockring tool $ 8 Replace the cassette
Chain checker $ 10 Check to see if chain needs to be replaced
Chain whip $ 20 Holds the cogs while using the cassette lockring tool
Bottom bracket tool $ 21 Used to install a new bottom bracket
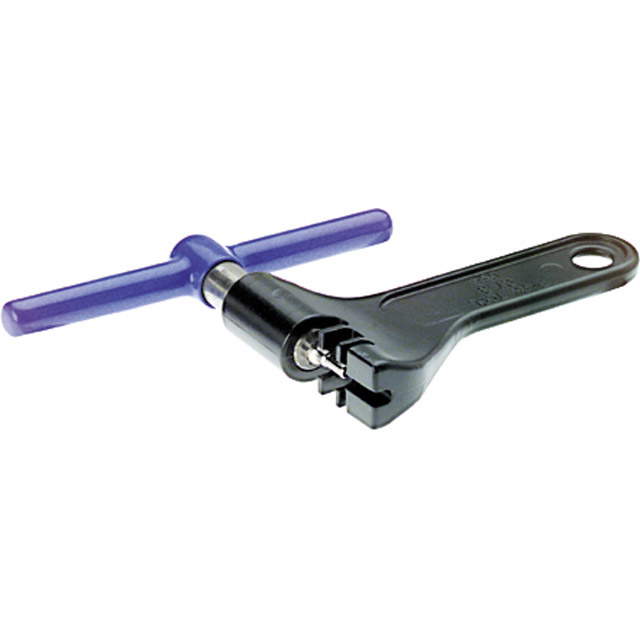
Chain tool $ 30 "Breaks" the chain so it can be replaced
Cable/housing cutter $ 33 Cut cables and cable housing for shifting and brakes
Stand $ 180 Holds the bike secure above the ground
Total $ 302


Cassette Lockring Tool

Chain Whip


Chain Checker

Chain Tool


Stand

Cable/housing Cutter


The Builder


Tool Price Description
Carbon saw blade $ 9 Cut the carbon steerer tube and carbon seat tube
Saw guide $ 35 Ensure straight steerer tube and seat tube cuts
Truing stand $ 99 Holds wheel and indicates out-of-true locations
Headset press $ 153 Install headset and bottom bracket
Total $ 296


Saw Guide

Truing Stand


Other

Some other tools and accessories you’ll need that you probably already own include electrical tape, hex wrenches, open-end wrenches, rags, scissors, screwdrivers, and zip ties. There are also some accessories that make life easier, like a handlebar holder ($18), work tray ($32), and cable stretcher ($40).


Cable Stretcher

Handlebar Holder

Did I forget anything? Let me know and I'll add it to the list.

New Bike Build: Part 4

Wednesday, February 19, 2014

Bike Build Part 1 Bike Build Part 2 Bike Build Part 3 Bike Build Part 4

Rufus Wright, yes... his name was Rufus

Apologies for the delay since the last bike build post. When I wasn't able to spend time on the bike I opted instead to write about all things bike-related. Now that the docs have cleared me to ride the trainer, all I want to do is ride -- and so the writing has been back-burnered.


Before we get started, a quick side story about the wrench photo above. In 1891, Rufus Wright and his son-in-law, Fred Morgan, started Morgan & Wright, a bicycle tire manufacturing company in Chicago. They also produced other bike components and accessories (like the wrench above). The company was very successful, later moving to Detroit in 1906 and bought by U.S. Rubber Co. in 1911, where their manufacturing techniques were utilized in the manufacturing of tires for automobiles. Rufus was a millionaire but lived modestly and was loved by his ~2,000 employees. Rufus married Helen Allen and they had two daughters. A brilliant inventor and craftsman, Rufus was also an accomplished artist. He spent a lot of time volunteering to educate poor boys in Chicago. He is noted for saying, "I never had any ambition for property beyond a comfortable recompense for my services and what I have I want to spend for the welfare of others."

Painting by Rufus (sold for $1,625)

In 1900, at the age of 67, Rufus was shot in the neck by a woman named Louisa. She was drunk and had asked Rufus to come over. They were talking when Louisa mentioned that she had a gun. He asked her to give it to him and after some convincing finally showed it to him. She refused, however, to hand it over and he struggled to take it from her. During the scuffle he was shot.

Louisa's words: "He fell back on the sofa and gasped that he was shot. I laughed hysterically and told him he was alright. He insisted that he had been wounded and begged me to call a doctor. I told him he was dreaming... I saw at a glance that the revolver had done deadly work, but I could not bring myself to tell anyone of the occurrence. I waited on Mr. Wright for about two hours before I summoned a doctor."

(green text to indicate drunken, slurred speech)

When help arrived, Rufus insisted that it was not Louisa's fault, but the police thought otherwise. He died shortly after from the wound. Sceptics suppose that Louisa had some mental troubles, was very drunk, and had told Rufus that she was going to kill herself. Rufus went to see her in an attempt to save her life – and in the process lost his. Even in his death his desire was to help Louisa, insisting that she not be charged with murder. In his eulogy, Rev. J.V. Blake said of Rufus, "Chicago has lost a mighty friend of charity in his death."

Rufus' headstone in Akron, Ohio

So why do I care? Well, he made a cool looking wrench, had a funny name, a mysterious death, and my great-great-great-grandfather's brother, George Wright, spent some time in Chicago in the late 1800s -- so there is a chance (albeit a small one) that I'm related to Rufus.

Anyway, enough somewhat-accurate, minimally-relevant, semi-interesting history. Back to the build.

When I was a kid, I loved taking things apart to see how they worked. Often, my curiosity resulted in my parent's disapproval, like the time I completely disassembled my sister's brand new home stereo, just two days after my father had purchased it for her birthday. I can still remember how angry he was when he discovered me in her room surrounded by screws, plastic covers, resistors, capacitors, wiring, etc. -- a screwdriver in my hand and a grin on my face. "It's alright dad, I'm going to put it back together." Somehow, he knew that when I finished there would be pieces left over... and the stereo would never work again.

Oops.

But I learned a lot from my youthful confidence, and the countless mistakes it resulted in. I have little doubt that the success I've had as a mechanical engineer could be attributed at least somewhat to the curiosity that drove my parents crazy for years. Problem solving techniques, out-of-the-box thinking, and the willingness to simply try something different have been huge in my professional development.

I have very limited experience with building a bike. But as I did so many years ago looking intently at my sister's stereo scratching my head with some needle-nose pliers, I'll give it a shot and see what happens...

Seatmast Clamp / Saddle / Di2 Battery


The Noah frameset employs the integrated seatmast and comes with the necessary clamp. The clamp fits snuggly to the seatmast and has a single hex key bolt to secure it. The saddle is held in place by a single hex bolt, accessible from the top. There are three saddle clamp positions for the hex bolt and a notched-hole for the Di2 wire that attaches to the battery.

Seatmast clamp shown by professional hand model

I was not a fan of the hex bolt. With the saddle installed, it was difficult to tighten the bolt and I didn't like the appearance of it. Plus, my multi-tool doesn't (and to my knowledge, no cycling-specific multi-tools do) have a wrench in it for that kind of bolt. I decided to trade it out for a knurled stainless steel hex key bolt, which makes installation much easier and has (in my opinion) a "cleaner" appearance. And if I need to adjust the saddle during a ride, I can use the multi-tool.

Replaced bolt shown by professional finger model / new bolt installed

The Di2 battery mounts to the seatmast clamp behind the seat tube under the saddle. An unfortunate issue is that whenever the battery needs to be removed for charging, the saddle is sort of in the way -- I won't have to loosen the saddle to get the battery out, but it is a tight fit. The battery charge is reported to last 600 to 1,500 miles (depending on how often you change gears), so it isn't a huge deal.

Di2 battery connector mounted to seatmast clamp / saddle and battery installed

Most Di2 batteries are installed below the bottle cage on the down tube, but the Noah places Shimano batteries behind the saddle and Campagnolo batteries on the down tube. The aerodynamics are theoretically better with it behind the saddle, and there's less chance of water / dirt / grime damaging it -- but I'm not sure I like the look of it up there and though I don't use one, it eliminates the ability to use a seat bag. I may end up swapping it out for an internal battery installed inside the seatmast.

Guidelines on the SLR saddle rails make adjustments easy

Using a hex key through the slot in the Flow saddle, installing, adjusting, and tightening were quick and easy. When the build is complete, I will adjust the saddle, stem, and handlebar positions to reflect my bike-fit measurements. At that time I will cut the seatmast for the necessary saddle height, hopefully remembering to measure a few times before grabbing the hacksaw.

Headset / Steerer Tube / Stem


The Noah comes with an FSA integrated headset with a nice shallow top cap about one-third the height of the monster that Specialized uses on the Allez. The Noah's head tube is 30 mm shorter than the Allez, but still a tad tall for my taste at 175 mm, so a shallow top cap helps with getting the bars nice and low.

I greased the necessary parts of the headset (the bottom race, top race, bottom bearing, top bearing, and the bottom and top surfaces of the head tube). The bottom race is already pressed on the steerer tube by Ridley. The lower bearing is installed angled-side-up on the steerer tube, and slid down to mate with the lower race, then inserted into the head tube. The top bearing is installed angled-side-down, slid down the steerer tube to the top of the head tube. The upper race slides down the steerer tube to mate with the top bearing. Then the top cap (with internal O-ring) slides down to cover up the top bearing. It's a very quick and easy installation -- the hardest part is probably remembering which way the angled bearings face -- and making sure none of that "gross green junk" (wifey's words) gets on the couch.

Bottom bearing on steerer tube sliding into head tube / top bearing and race

I stole the 3T ARX Pro 110 mm, 17-degree stem from the demolished Allez and decided to try it out on the Noah to see if the length would work before buying a new stem. The Allez had a reach (horizontal distance from bottom bracket to top of head tube) of 397 mm and the Noah has a reach of 390 mm. So it may end up that I need a 120 mm stem to align with my previous bike fit, but with the stack (vertical distance from bottom bracket to top of head tube) and head tube both being shorter on the Noah, the 110 mm stem may just work out perfectly. With the Noah's head tube angle being 73.5 degrees, the 17-degree stem (flipped) makes the stem just about parallel to the ground. If I keep it, for aesthetics I'll probably use some acetone and a rag on the stem to remove the 3T logos (and maybe the stripe too).

With the back injury and unknown flexibility I fought the urge to slam the stem and cut the steerer tube accordingly. I added a 7 mm spacer on top of the headset and then another 5 mm spacer on top of the stem, giving me 12 mm of available "comfort adjustment" in case I find it's needed. If my post-recovery flexibility can handle the slammed stem I will remove the spacers and re-cut the steerer tube.

Headset installed with shallow top cap / spacers and stem setup

With the headset, spacers, and stem installed I marked the steerer tube with a paint pen and then disassembled it all so I could make the cut. I removed the top spacer to mark the cut line because I want the steerer tube to be slightly (2-3 mm) lower than the spacer to correctly install the headset preload expander. I used a hacksaw guide made by Park Tool, and a blade specific for cutting carbon fiber.

Steerer tube cut line just above stem / hacksaw cutting guide

The cutting guide clamps into a vice to hold the steerer tube steady while you cut. A standard hacksaw blade will work provided it has small teeth and is sharp. You want the cut to be straight and smooth, and remember not to inhale the carbon fiber dust (I think it kills you). Once cut, you can use a file or sandpaper to make the end nice and smooth.

Cutting the steerer tube / don't inhale the dust

After cutting it, I used the little trick of writing my info on the hidden portion of the steerer tube. It doesn't prevent theft, but it can help prove ownership if the bike is recovered. Taking pictures of everything is important too, including (especially) the serial number. Photo documentary, receipts, and a detailed list of bike components greatly assists with insurance claims too. I have a template you can download in my Insurance for Cyclists post.

Owner info / steerer tube cut 2-3 mm below the spacer

You can see how the steerer tube is 2-3 mm lower than the spacer to allow proper installation of the preload expander. The insert preloads the headset by expanding when you tighten the hex key bolt. It comes with an optional sleeve if you need it. I like the expander that came with the Noah -- the one from Specialized was finicky.

Headset preload expander with optional sleeve / installing expander

I tightened the preload expander until there was no play in the headset and then tightened the bolts for the stem (using a 5 N·m torque wrench). You want the headset to be snug but not over-tightened as it will affect steering and bearing wear. If the headset is too loose you can damage the bearings. Once the build is complete I will loosen the stem and expander and re-tighten it all again to make sure it is properly preloaded.

Adjusting the headset preload / tightening the stem bolts

Handlebars / Shifters


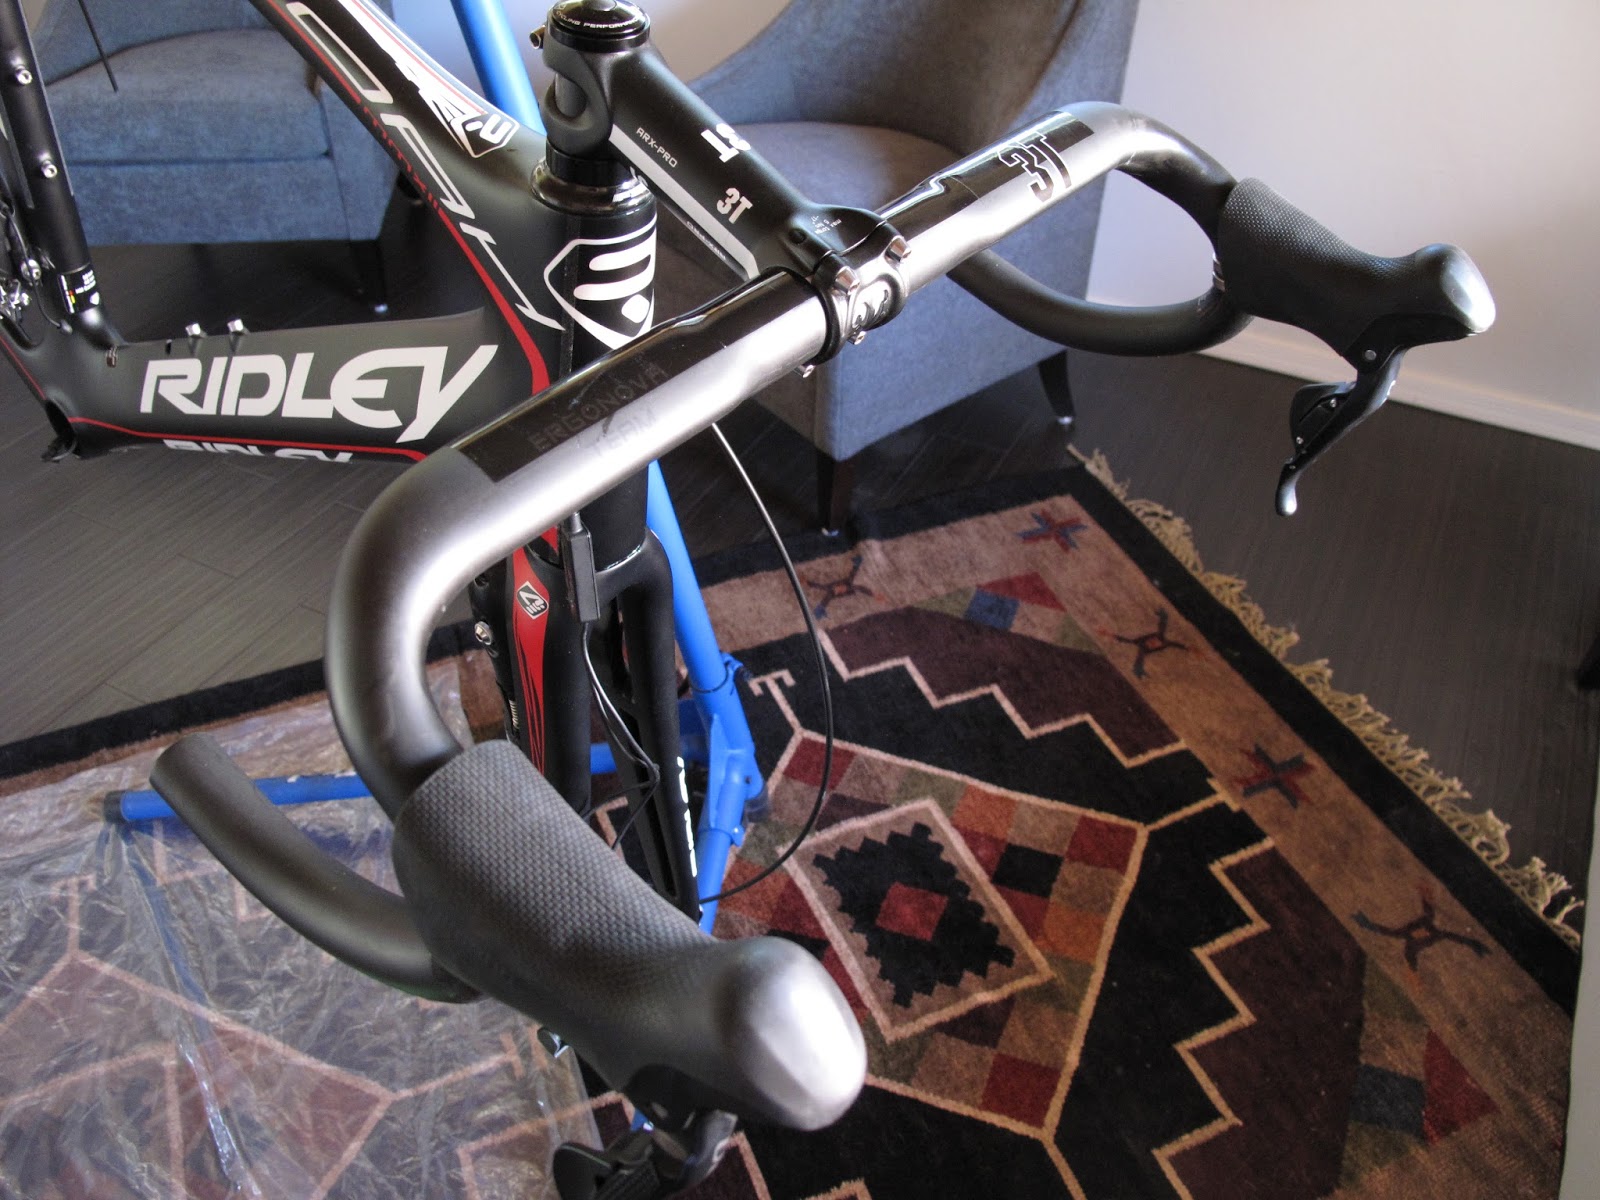
The 3T Ergonova Team Stealth handlebars were a take-off from a bike-shop build and offered to me at a great price. The weight savings of going with these carbon fiber bars is about 67 g, and carbon fiber should help with some vibration dampening. The Ergonova bars employ an "egg-shaped" top meant to provide more comfort (to be determined) and I suppose a little aerodynamic benefit. These bars have a 6-degree flare-out in the drops, making sizing a little different from other bars I've used (44 cm center-to-center is 42 cm at the hoods). The drop of these bars is 123 mm and the reach is 77 mm, both very close to what I am used to.

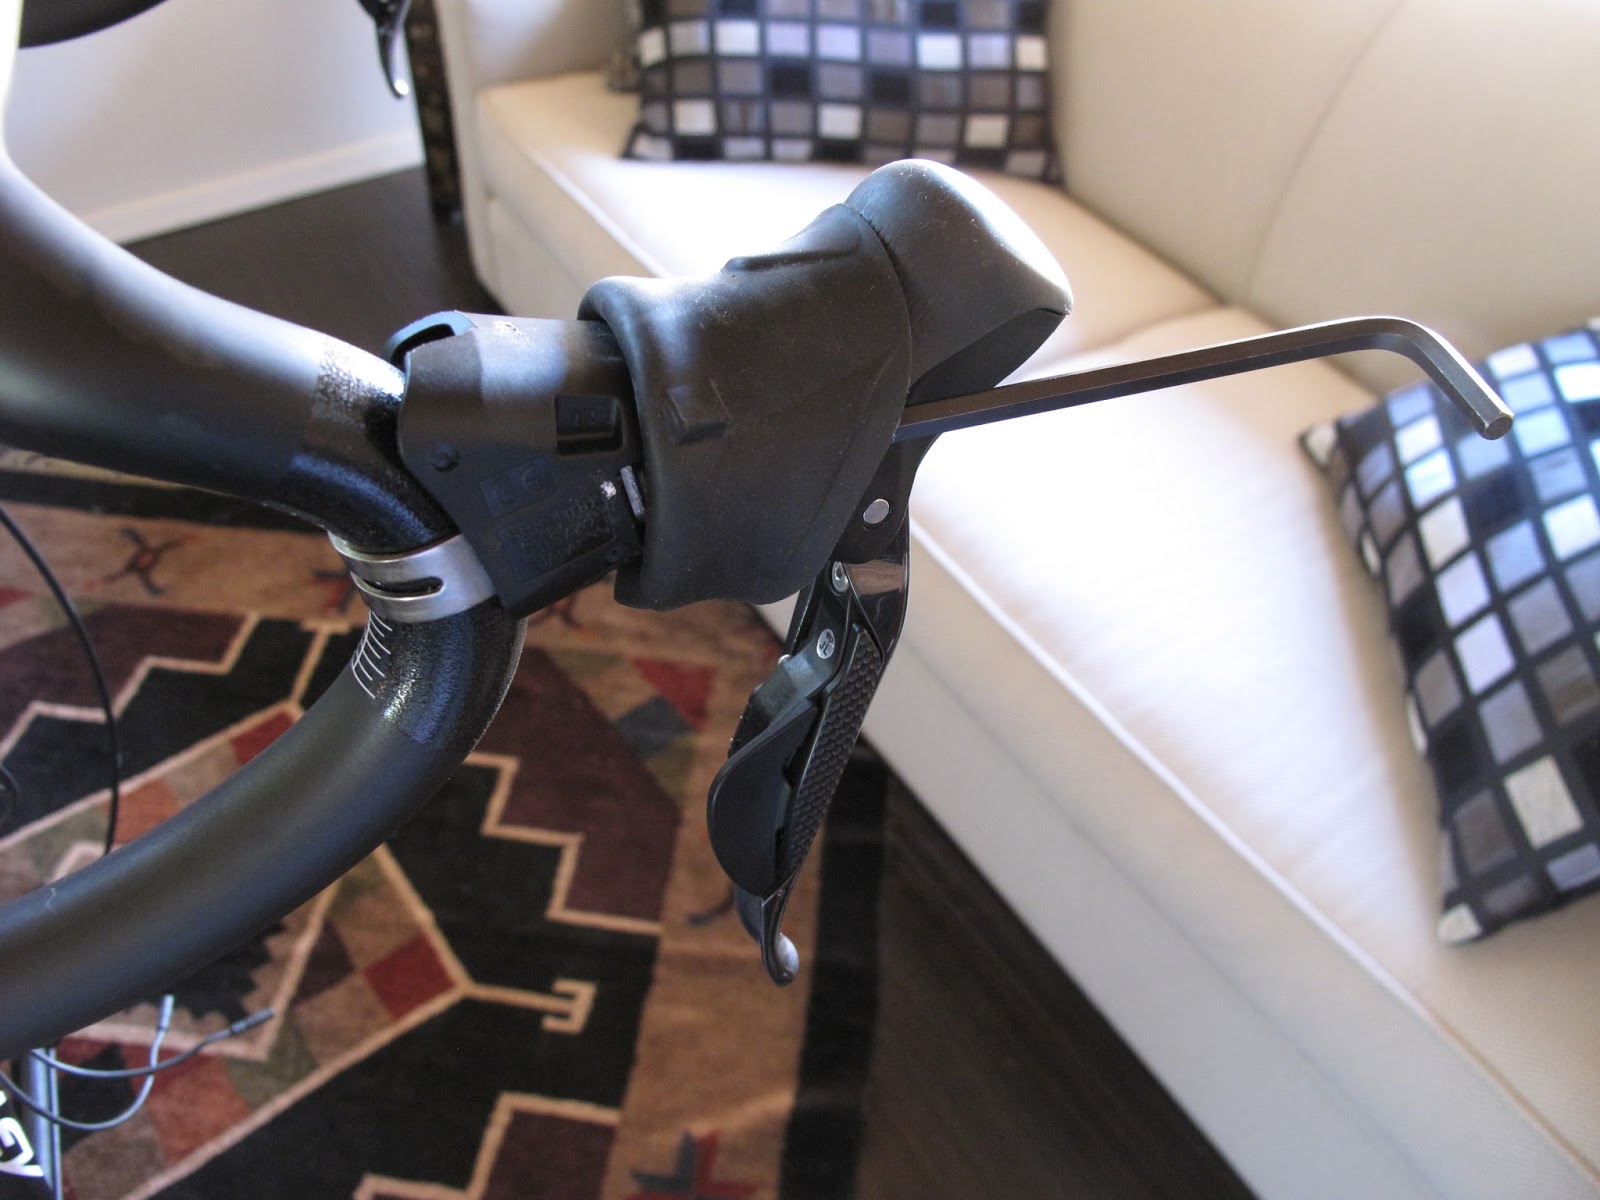
Installing the handlebars / installing the shifters

Installing the bars is easy. The handlebars have guidelines printed on them to assist with centering, then you rotate them for proper alignment and tighten the four hex key bolts (evenly) to 5 N·m. The flat top is noticeably large, which makes the bars look "heavy" to me -- but I'll try them out and see what I think. I don't ride on the tops much so the comfort of the egg-shape is not really important. I do, however, like the narrower hood location and the flare-out in the drops. And I'll have to do some riding before I can decide if I like the specific ergonomic curvature of these bars (I expect to like it).

Adjusting the height of the shifters / bars and shifters installed

The Ultegra 6700 Di2 shifters feel very similar to the Dura Ace 7800 shifters I had on the Allez. I prefer the feel of these Shimano hoods over the Campagnolo and SRAM ones. The shifters install on the bars by loosening the clamp using a hex key and sliding them up to the appropriate position on the bars. Again, there are guidelines printed so you can install both left and right at the same height. Hood location can be based on feel -- I like a smooth, flat transition from bars to hoods. When doing long hard efforts solo and trying to be "aero" I alternate between IAB (invisible aero bars) and the Sphinx position (which to me is more comfortable with a smooth transition from bars to hoods). Of course when setting up bars one must also take into consideration Rule #46.

Side profile showing bar rotation and shifter location

In Part 5 (which will hopefully be posted before 2015) I'll be installing the brake cables, Di2 wiring, derailleurs, bottom bracket, crankset, and chain.

Bike Build Part 1 Bike Build Part 2 Bike Build Part 3 Bike Build Part 4

New Bike Build: Part 2

Sunday, November 17, 2013

Bike Build Part 1 Bike Build Part 2 Bike Build Part 3 Bike Build Part 4


When looking at components, I compared cost, value, quality, weight, function, durability, ergonomics, and aesthetics. With the frameset chosen I had a starting point to use as a sort of gauge. An aero road bike designed to perform well on flats, but not so heavy that it would be a problem on the climbs. Not necessarily an inexpensive frame, but I think arguably one of the better values available. I decided to leave wheels out of this blog post as there are a lot of options available and I felt they were important enough to warrant their own post.

Shifters and Derailleurs


Instead of purchasing a complete groupset, I decided to break out the shifters and derailleurs. I wanted to go with the best value, not necessarily the highest quality. There are other options out there, but the main ones on my radar were:

Campagnolo
  • Super Record*
  • Record*
  • Chorus
Shimano
  • Dura Ace*
  • Ultegra*
  • 105
SRAM
  • Red
  • Force
  • Rival
* Available as mechanical or electronic: EPS (Campagnolo), Di2 (Shimano)

In case you're interested, I left off Campagnolo's Athena, Centaur, and Veloce; Shimano's Tiagra and Sora; and SRAM's Apex; (as well as others). I need to keep this blog posts under 10 pages.

Campagnolo is more expensive than Shimano and SRAM, but if I'm not mistaken does provide the ability to take apart and repair the components. A lot of Campy fans have pointed this out but I personally don't see it as a major selling point. The risk that I'll need to disassemble and replace pieces of a component are pretty minor. It's more likely I'd be buying an entirely new component. Another benefit of Campagnolo is the quality of their components, but both Shimano and SRAM have stepped up to the level that Campy set and it appears to me that they compete well in terms of quality. Campy fans may argue but I feel confident stating that the quality and repairability of Campagnolo does not adequately justify the additional cost. Another benefit of Campagnolo is that, when comparing similar product lines, they tend to be slightly lighter. This is not a rule for all tiers and the weight savings is pretty minor so I am ignoring it.

SRAM is based in the United States (Chicago to be exact), which I like. Unfortunately, they don't have an electronic group available yet and I'm not a fan of their double-tap shifting style. I really like the aesthetics of SRAM's Red groupset but when visiting bike shops I've tried out the SRAM shifters and they felt strange to me -- not sure what it was, may be just that I'm used to Shimano, but they didn't quite fit my hand. Shift style and ergonomics are highly subjective and likely based on past usage bias. For me, I preferred the feel of the Shimano shifters as well as the method of shifting.

SRAM Double Tap Shifter

I know 11-speed setups are talked a lot about right now. I'm just not convinced that it will be a big deal to me, so I'm ignoring it for the most part. I had a 10-speed 53/39 crankset with an 11-25 cassette and it worked very well for me. I've done steep (in excess of 10%) climbs with an 11-28 and still didn't feel like I needed an extra gear. 11-speed will likely become the norm, but right now I don't see a reason to seek it out intentionally.

Another new trend is electronic shifting. Campagnolo has EPS (Electronic Power Shift) and Shimano has Di2 (Digital Integrated Intelligence). Everyone I've talked to who has it says that it is well worth it -- but of course there is some bias there. I've read some so-called unbiased reviews that also claim electronic is the way to go and there do seem to be some good arguments for it. Shifting is easy and precise, chain rub is reduced or eliminated, and cable maintenance is gone. The downsides seem to be price and weight, but could also include repair issues, and of course the dreaded mid-race (or mid-ride) dead battery.

Campagnolo and Shimano both have two options for Di2. The main difference is weight. Here are the weight differences between them (just shifters and derailleurs):

Campagnolo
Shimano
Super Record / Dura Ace
589 g
604 g
Record / Ultegra
602 g
753 g
Difference
13 g
149 g

The weight difference between Super Record and Record is non-existent. For Shimano, the price difference to go up to Dura Ace is significant at around $1,100, which means you'd be spending $7.33 per gram saved. You'd be better to spend money on lighter handlebars (3T Ergonova Team vs. Pro is $3.28/g) and/or a lighter saddle (Selle Italia Tekno Flow vs. SLS Kit Carbonio Flow is $2.74/g). Those two upgrades together would save you 184 grams and only cost $540. There is a small difference in shifting noise from Dura Ace to Ultegra, and the rear derailleur shifting under heavy (sprinting out of the saddle) loads is described as "clunks" instead of "slides" -- but it's doubtful those differences are worth much. VeloNews has a very nice article comparing Dura Ace and Ultegra Di2 systems (click here to view).

For me, I ruled out Campagnolo completely because the value is relatively low. I'd be paying a lot of extra money for slightly lighter, slightly higher quality, and perhaps slightly more durable components. One could even argue the quality and durability are the same for all three manufacturers. If you're a Campy fan feel free to comment below.

I really wanted to try out electronic shifting, which ruled out SRAM. That, coupled with my dislike for the double-tap shifting and shifter feel has kept me in the Shimano family for this build.

The last choice was easy for me. There is no value in going with Dura Ace Di2 over Ultegra -- not unless you are willing to squeeze every gram out of the build (which I am not). So I chose Ultegra Di2. I searched online for the best deal and ended up finding a very gently used "upgrade kit" (shifters, derailleurs, wiring, and battery) on Ebay at an incredible price. It will be interesting learning how to install an electronic system (coming soon).

Ultegra 6700 Di2

Crankset, Cassette and Chain


Since the crankset, cassette and chain wear much faster than the other components, I like to separate them to determine value. The chain wears the fastest, while the crankset and cassette (in theory) wear at the same rate. With the chain wearing fast, something inexpensive and durable (not lightweight) is desired. I'm willing to deal with some extra weight here and justify it by taking the cost savings and applying it to weight saved on components that last much longer. I've been a fan of the KMC X10.93 chain because it's inexpensive, durable, and has the quick-link. The KMC chain weighs 290 grams vs. Ultegra weighing 272 grams (when comparing 116 links). The cost difference between the two is only about $20, but since I replace my chain every 2,000-2,500 miles (about 4 chains per year) it quickly becomes unworthy of the added cost.

By replacing the chain often, the life of the cassette and chainrings can extend beyond 5,000 miles so weight becomes a little more of an issue. I've been able to go a full year before needing to replace the cassette and chainrings. Since I'm going with Ultegra shifters and derailleurs, and I think the dark gray color that Ultegra offers looks better than the silver when installed on a black bike, I decided to just go with Ultegra for the crankset. For the cassette, I already had an 11-25 model 105 that was going to go on the Allez so I will go ahead and use it on the Noah until it wears out. When it comes time to replace it I will likely switch to Ultegra for the weight savings. Ultegra weighs 35 grams less at a cost of around $0.50/g.

Ultegra 6700 Crankset (dark gray)

Bottom bracket. The Noah frameset has a pressfit 30 (PF30) bottom bracket (46mm diameter and width of 68mm). Using the Ultegra Hollowtech crankset, I will need to install an adapter and there are a couple different options. Wheels makes the least expensive option with two separate cups that fit into the frame. I utilized these on the Allez and I didn't care for them at all. About once a month I would remove the crankset, take out the cups, clean everything, re-grease it, and put it all back together in order to get rid of clicking that would develop when the cups became slightly out of alignment. Shimano has a one-piece adapter but it doesn't look like very good quality and for a few dollars more, Praxis Works has a new option that appears to be very promising.

Praxis Works Conversion Bottom Bracket

Other Components


The other main components are the three areas of contact, the handlebars (and stem), pedals, and saddle. The style of handlebars tends to be subjective and I've been wanting to try out the 3T Ergosum with the flat-ish tops to see how they feel so when Chris at ProBike offered me some for a smoking deal I went for it. I like having the manufacturer's of the handlebars and stem match and I liked the 3T ARX stem I used on the Allez so I'll go with it again, this time using the Team version with the red stripe (matching the black/red color scheme of the bike). The handlebars are the Stealth version (all black) and I thought about going with the black/red there too but thought it might be too much color coordination so I'm going to stick with just black for now. One thing I learned about the Ergosum handlebars is that because of the way they are shaped, you should buy one size larger than you normally would -- so, if like me you use a size 44cm, you would buy a 46cm.

3T Ergonova Team Stealth
3T ARX Team

For pedals, I wanted to stay in the Shimano family. I looked at a couple options here: Dura Ace, Ultegra Carbon, Ultegra, and 105. The weight differences for these models are:

Weight
Price
Dura Ace
248 g
$400
Ultegra Carbon
260 g
$200
Ultegra
317 g
$200
105
325 g
$110

To go from 105 to Ultegra is $11.25/g but from 105 to Ultegra Carbon is $1.40. To go from Ultegra Carbon to Dura Ace is $16.67/g so this decision was very easy for me, I went with Ultegra Carbon.

Ultegra Carbon Pedals

For the saddle I'm going with the Selle Italia SLR Kit Carbonio Flow. I've tried a Selle San Marco Zoncolan which was alright, a Fizik Arione which was uncomfortable, a Specialized Romin which was alright, and a Selle Italia SLS Flow which I liked most. The SLS is the less expensive option to the SLR, with the SLR weighing 90g less at about $2/g.

A quick side note. I found a great deal at ProBikeKit for this saddle which, coupled with a $15 off coupon code came to around $150. I noticed they were selling like mad on Ebay for over $200 so I ended up buying four saddles and selling three of them on Ebay, effectively making my saddle free. Well, it did take around a 30 minutes of my time to unpack and repack the saddles, print the shipping labels, and put the box in the outgoing mail area of my office.

Selle Italia SLR Kit Carbonio Flow

In Part 3, I will discuss wheels. With an aero road bike, I think deep carbon wheels will look and perform best. I will be looking at aerodynamics, weight, aesthetics, braking performance, cross-wind performance, maintenance, technology, and price.

Bike Build Part 1 Bike Build Part 2 Bike Build Part 3 Bike Build Part 4